Implementing a logger in Node application
Why is logging important in any backend application?
Logging is one of the key aspect for developing any backend application. If we are working on any backend application, then debugging the application and finding exact bug in the code for certain problem can be a gruesome job. This is place where we could assign this task to a logger, which logs every activity at the backend and gives the developer or a team the snapshot of those activities. So, I’ll be discussing some best practices which I learnt this week about logging in nodejs.
Using Winston logger for node application
I’ll be trying to the discuss about one of the most successful logger for any javascript application i.e. winston logger.
Setting up the winston Logger
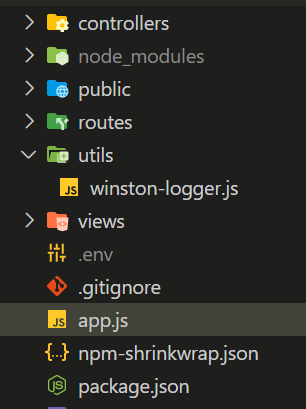
Before actually talking about setting it(winston) up in the application, I’ll be sharing my project structure below which explains how the project is structured in MVC format.

As we can see the entry point for our application is app.js and our main route-controllers are placed in controllers directory. Now, let us create a new class and directory for our logger in order to keep our workspace clean and modular.
- But before that, we need to add
winstonto our project. For that crack open the terminal and type:
$ npm install winston --save
- Once
winstonis added to our project andpackage.json, create a directory with any name(I’ll name it asutil) and inside that directory create a file with any name(I’ll name it aswinston-logger.js). - Now that the file is created, we need to create a
classinside it with any name(I’ll useLogger). - Next, we require to include
winstonmodule for our class implementation, so we’ll create it as a constant outside our class(for best practices).
const winston = require('winston);
- Inside the constructor of our class
Logger, I created three fields;- The first one is the
applicationNamefrom which I could get the application name in order to pretty print the logs to a file or a console. - The second one is the
logFormatwhich would actually return the format in which we want the messages to be seen on the file or our console. - The third one is the
winstonspecific field which helps us create the logger in the custom way which we want. I used three main arguments of thecreateLoggermethod but there are others in case we want them in future.- The first one is the log level with the name
level. - The second one is the format where we will use
combine()method of winston which will be packed with three parameters. The first one is thetimestamp()which will give us the timestamp, the second one is the optionalcolorize()method which will color the logs based on log levels. - The third one is the transports which I used to log into the console itself.
- The first one is the log level with the name
- Finally I exported the class object to be used as utility in any file which we want. Now we can use the object in any file just by including the file and using
logger.winton.info()orlogger.winston.error()or whatever log level we want.
- The first one is the
Complete code
// winston-logger.js
const winston = require("winston");

class Logger {
  constructor(applicationName) {
    this.applicationName = applicationName || "defaultAppName";

    this.logFormat = winston.format.printf((info) => {
      const formattedDate = info.timestamp.replace("T", " ").replace("Z", "");
      return `[${formattedDate}][${this.applicationName}][${info.level}]${info.message};`;
    });

    this.winston = winston.createLogger({
      level: global.logLevel || "info",
      // level: "debug",
      format: winston.format.combine(
        winston.format.timestamp(),
        winston.format.colorize(),
        this.logFormat
      ),
      transports: [new winston.transports.Console({})],
    });
  }
}
const logger = new Logger();
module.exports = logger;
// Usage in some other file(Please don't include below lines in winston-logger.js file itself)
logger.winston.info('Server started...');
logger.winston.error('Some error occurred...');